Technical Drawings and Sketches
Introduction
The entire world depends upon technical drawings to convey the ideas that
feed today’s industrialized society. Architectural, structural, electric,
electronic, machine, plumbing, and piping drawings are all forms of
mechanical/technical drawings. When rendering technical drawings, accuracy,
neatness, technique, and speed in execution are essential. Inaccurate drawings
could be worthless or lead to costly errors.
Technical
Technical drawing is a necessarily broad term that applies to any drawing used
drawings and
to express technical ideas. Technical drawings are usually mechanically
sketches
refined by using straightedges, triangles, and drafting instruments. Many of
these drawings begin as a form of sketching. Technical sketching is a freehand
sketch. The only equipment required to execute technical sketches are soft
pencils in the F to HB range, paper, and an eraser. The novice sketcher may
find paper that is cross sectioned with ruled lines beneficial in establishing
and maintaining scale. There are gridded papers, isometric papers for
isometric sketches, and perspective papers for sketches requiring perspective
available. When selecting an eraser, chose a soft (pink) or artgum eraser.
Types of
sketches
Since technical sketches and drawings represent three-dimensional objects,
your sketches should conform to one of the four standard types of projection.
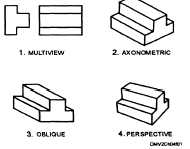
The four major types of projection are (1) multiview, (2) axonometric, (3)
oblique, and (4) perspective. Each type of projection is covered in detail in
later chapters of this volume.
Figure 4-1 shows the four types of projections.
Figure 4-1.—The four types
of projections.
Continued on next page
4-4


