Orthographic Projections, Continued
Normal and
oblique lines
A normal line in a multiview projection is parallel to two of the planes of
‘projection and perpendicular to the third. A line parallel to a plane of
projection appears in true length depending on the scale of the drawing. A
line perpendicular to a plane of projection appears on that plane as a point.
A line perpendicular to one plane of projection must be parallel to the other
two, but a line parallel to one plane of projection may be oblique to one or
both of the others. This type of oblique line appears in true length in a view
on the plane of projection to which it is parallel but appears foreshortened in
all regular views of the object.
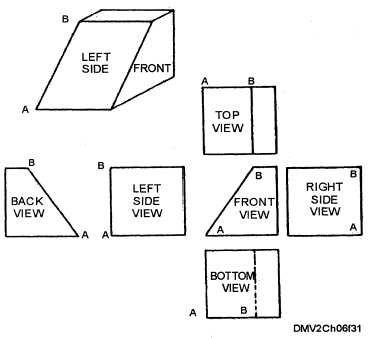
Figure 6-31 is a pictorial drawing of a block in the upper-left corner. Placing
the front face parallel to the vertical plane in a multiview projection places
the bottom face parallel to the horizontal plane and right-side face parallel to
the profile plane. Line AB is parallel to the vertical plane but oblique to both
the horizontal and the profile planes. Only in the front and back views is line
AB shown in true length. In all other views AB is foreshortened.
Figure 6-31.—Line AB in true length on the front and back
view.
Continued on next page
6-37


