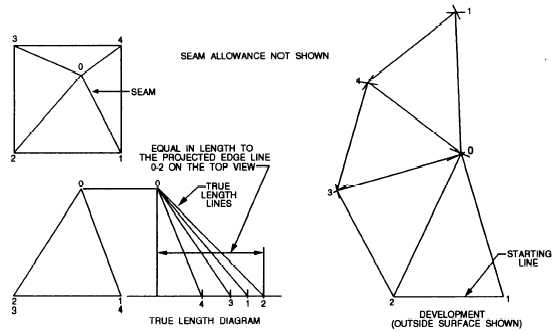
Figure 8-10.—Development of an oblique pyramid by triangulation.
Right Pyramid
Construct a radial-line development of a triangle
with a true length-of-edge line (fig. 8-9) and a right
pyramid having all the lateral edges (from vertex to the
base) of equal length. Since the true length of the lateral
edges is shown in the front view (line (0-1 or 0-3) and
the top view shows the true lengths of the edges of the
base (lines 1-2, 2-3, and so on), the development may
be constructed as follows:
With 0 as center (corresponding to the apex) and
with a radius equal to the true length of the lateral edges
(line 0-1 in the front view), draw an arc as shown. Drop
a perpendicular line from 0 to intersect the arc at point
3. With a radius equal to the length of the edge of the
base (line 1-2 on the top view), start at point 3 and step
off the distances 3-2, 2-1, 3-4, and 4-1 on the large arc.
Join these points with straight lines. Then connect the
points to point 0 by a straight line to complete the
development. Lines 0-2, 0-3, and 0-4 are the fold lines
on which the development is folded to shape the
pyramid The base and seam allowance have been
omitted for clarity.
Oblique Pyramid
The oblique pyramid in figure 8-10 has all its lateral
edges of unequal length. The true length of each of these
edges must first be found as shown in the true-length
diagram. The development may now be constructed as
follows:
Lay out base line 1-2 in the development view equal
in length to base line 1-2 found in the top view. With
point 1 as center and a radius equal in length to line 0-1
in the true diagram, swing an arc. With point 2 as center
and a radius equal in length to line 0-2 in the true-length
diagram, swing an arc intersecting the first arc at 0. With
point 0 as center and a radius equal in length to line 0-3
in the true-length diagram, swing an arc. With point 2
as center and radius equal in length to base line 2-3 found
in the top view, swing an arc intersecting the first arc at
point 3. Locate points 4 and 1 in a similar manner, and
join those points, as shown, with straight lines. The base
and seam lines have been omitted on the development
drawing.
Truncated Pyramid
Figure 8-11 shows a truncated pyramid that is
developed in the following manner: Look at the views
in figure 8-11 as you read the explanation.
Draw the orthographic views, extending the lines of
the sides to the apex at the top in view A. Draw three
horizontal construction lines on the right side of the
orthographic view (view B), one from the center of the
top view; one from the top of the front view; and one
from the bottom of the front view. With the point of the
compass in the center of the top view, scribe two arcs
(view C). Draw one from the inside corner of the top
view to the horizontal line (point W), and the other from
the outside corner of the top view to the horizontal line
(point X). Draw two vertical lines, one from point W in
8-7


