lines we will explain in the following paragraphs. In
addition, we will explain the use of circles and curved
lines at the end of this section.
VISIBLE LINES represent visible edges or
contours of objects. Draw visible lines so that the
views they outline stand out clearly on the drawing
with a definite contrast between these lines and
secondary lines.
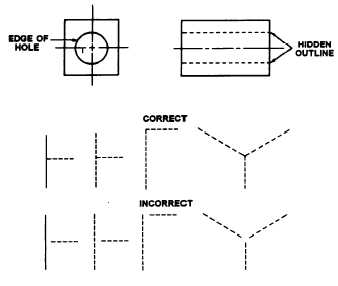
HIDDEN LINES consist of short, evenly-spaced
dashes and are used to show the hidden features of an
object (fig. 2-8). You may vary the lengths of the
dashes slightly in relation to the size of the drawing.
Always begin and end hidden lines with a dash, in
contrast with the visible lines from which they start,
except when a dash would form a continuation of a
visible line. Join dashes at comers, and start arcs with
dashes at tangent points. Omit hidden lines when they
are not required for the clarity of the drawing.
Although features located behind transparent
materials may be visible, you should treat them as
concealed features and show them with hidden lines.
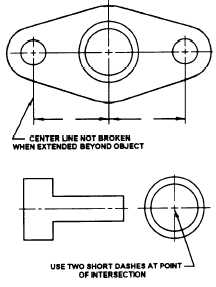
CENTER LINES consist of alternating long and
short dashes (fig. 2-9). Use them to represent the axis
of symmetrical parts and features, bolt circles, and
paths of motion. You may vary the long dashes of the
center lines in length, depending upon the size of the
drawing. Start and end center lines with long dashes
and do not let them intersect at the spaces between
dashes. Extend them uniformly and distinctly a short
distance beyond the object or feature of the drawing
unless a longer extension line is required for
Figure 2-8.—Hidden-line technique.
Figure 2-9.—Center-line technique.
dimensioning or for some other purpose. Do not
terminate them at other lines of the drawing, nor
extend them through the space between views. Very
short center lines may be unbroken if there is no
confusion with other lines.
SYMMETRY LINES are center lines used as axes
of symmetry for partial views. To identify the line of
symmetry, draw two thick, short parallel lines at right
angles to the center line. Use symmetry lines to
represent partially drawn views and partial sections of
symmetrical parts. You may extend symmetrical view
visible and hidden lines past the symmetrical line if it
will improve clarity.
EXTENSION and DIMENSION LINES show the
dimensions of a drawing. We will discuss them later
in this chapter.
LEADER LINES show the part of a drawing to
which a note refers.
BREAK LINES shorten the view of long uniform
sections or when you need only a partial view. You
may use these lines on both detail and assembly
drawings. Use the straight, thin line with freehand
zigzags for long breaks, the thick freehand line for
short breaks, and the jagged line for wood parts.
You may use the special breaks shown in figure
2-10 for cylindrical and tubular parts and when an end
view is not shown; otherwise, use the thick break line.
CUTTING PLANE LINES show the location of
cutting planes for sectional views.
2-6


