Tolerances, Continued
Basic hole
The basic hole system is a system of fits in which the design of the hole is the
system
basic size and the allowance applies to the shaft.
When specifying the tolerances for a hole and cylinder and determining their
dimensions, you should begin calculating by assuming either the minimum
(smallest) hole or the maximum (largest) shaft size if they are to fit together
well.
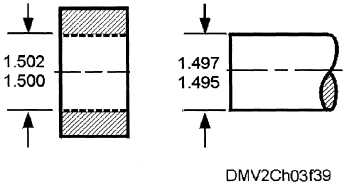
Figure 3-39 illustrates the basic hole system.
Figure 3-39.—The basic hole system.
In the illustration, the minimum hole size is the basic size. To calculate the
maximum diameter of the shaft, assume an allowance of .003 inch and
subtract that from the basic hole size.
Arbitrarily selecting a tolerance of .002 inch, apply the tolerance to both the
hole and the shaft. This give a maximum hole (1.502 inches) and minimum
shaft (1.495 inches). The minimum clearance fit is the difference between
the smallest hole (1.500 inches) and the largest shaft (1.497 inches) or .003
inch. The maximum clearance fit is the difference between the largest hole
(1.502 inches) and the smallest shaft (1.495 inches) or .007 inch.
Determine the maximum shaft size of an interference fit by adding the
allowance (.003 inch) to the basic hole size (1.500 inches) or 1.503 inches.
To convert basic hole size to basic shaft size, subtract the allowance for a
clearance fit or add it for an interference fit.
Continued on next page
3-44


