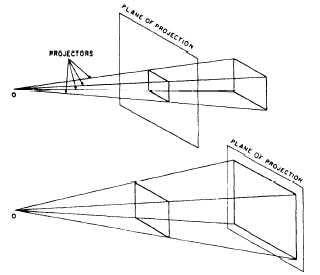
fig. 3-3. It is called central projection because the lines
of sight, or projectors, meet at a central point; the eye
of the observer.
You can see that the projected view of the object
varies considerably in size, according to the relative
positions of the objects and the plane of projection. It
will also vary with the distance between the observer
and the object, and between the observer and the plane
of projection. For these reasons, central projection is
seldom used in technical drawings.
If the observer were located a distance away from
the object and its plane of projection, the projectors
would not meet at a point, but would be parallel to each
other. For reasons of convenience, this parallel
projection is assumed for most technical drawings and
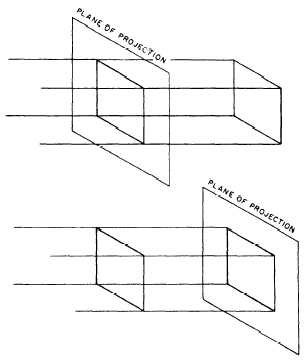
is shown in figure 3-4. You can see that, if the
projectors are perpendicular to the plane of projection,
a parallel projection of an object has the same
dimensions as the object. This is true regardless of the
relative positions of the object and the plane of
projection, and regardless of the distance from the
observer.
ORTHOGRAPHIC AND OBLIQUE
PROJECTION
An ORTHOGRAPHIC projection is a parallel
projection in which the projectors are perpendicular to
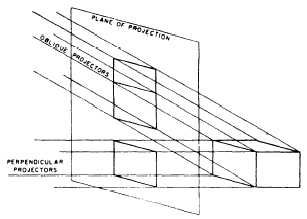
the plane of projection as in figure 3-4. An OBLIQUE
projection is one in which the projectors are other than
perpendicular to the plane of projection. Figure 3-5
shows the same object in both orthographic and
oblique projections. The block is placed so that its
Figure 3-3.—Central projection.
3-2
Figure 3-4.—Parallel projections.
Figure 3-5.—Oblique and orthographic projections.
front surface (the surface toward the plane of
projection) is parallel to the plane of projection. You
can see that the orthographic (perpendicular)
projection shows only this surface of the block, which
includes only two dimensions: length and width. The
oblique projection, on the other hand, shows the front
surface and the top surface, which includes three
dimensions: length, width, and height. Therefore, an
oblique projection is one way to show all three
dimensions of an object in a single view. Axonometric
projection is another and we will discuss it in the next
paragraphs.

